Overview
In this article I am going to explain how to leverage Cisco ISE and Okta Integration for implementing Single Sign On (SSO) for Cisco ISE Admin portal. In addition, this solution allows you to use One Time Password (OTP) for login flow in to the Cisco ISE GUI admin portal.
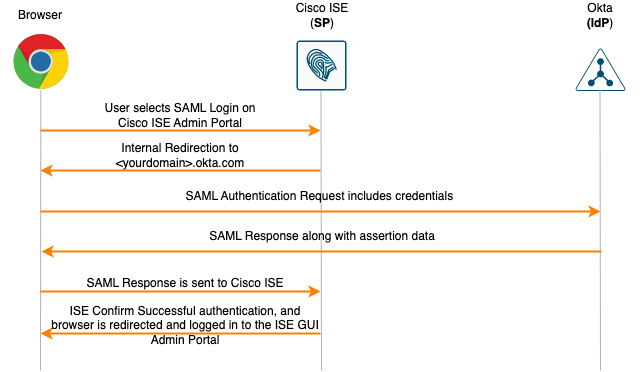
Before moving on to the configuration part, it is good idea to understand some glossaries. Security Assertion Markup Language (SAML) is an open standard that allows Identity Source Provided (IdP) in order to pass authorization credentials to Service Provider (SP). SAML transactions use XML for standardized communications between the identity provider, in our case Okta, and service providers which in this scenario is Cisco ISE Admin Portal. The XML document that IdP sends to the SP includes user authentication status, user’s attributes, and authorization decision. This XML document is called SAML Assertion.
The below diagram demonstrates transactions between a user browser, Cisco ISE admin portal (SP), and Okta (IdP).
Configuration
The configuration steps are quite straight forward, however they must be done in the exact order.
Cisco ISE Configuration Part 1
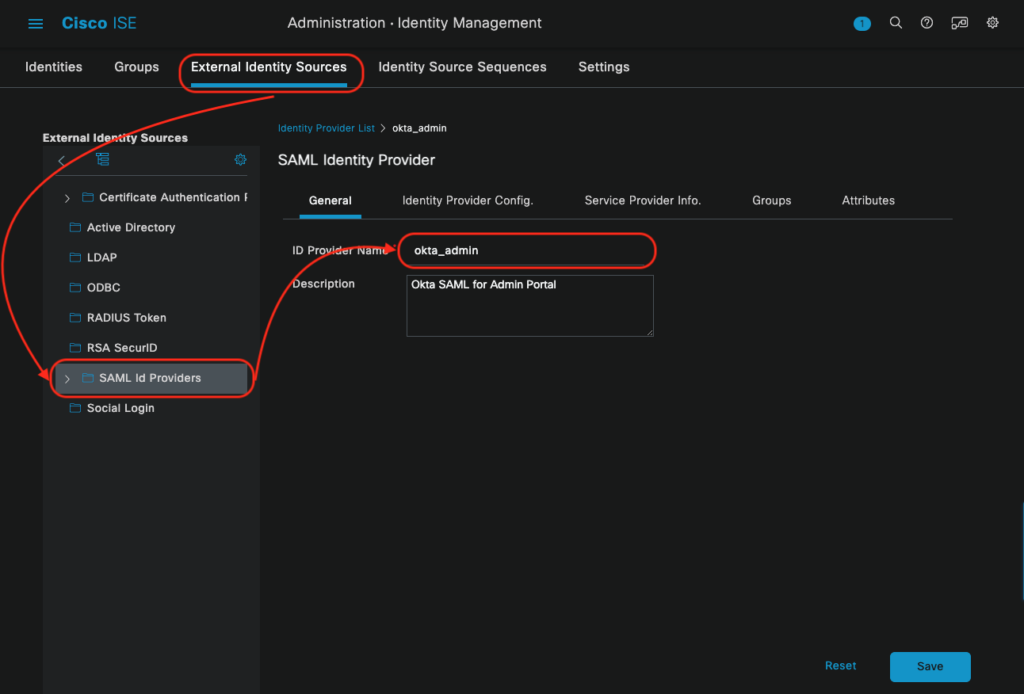
Step 1: Configure Okta as an external identity source
In the Cisco ISE navigate to the following direction. Administration -> Identity Management -> External Identity Sources > SAML Id Providers and click the Add button. Enter the Identity Source Provider name, leave other tabs as it is and click on the Submit button.
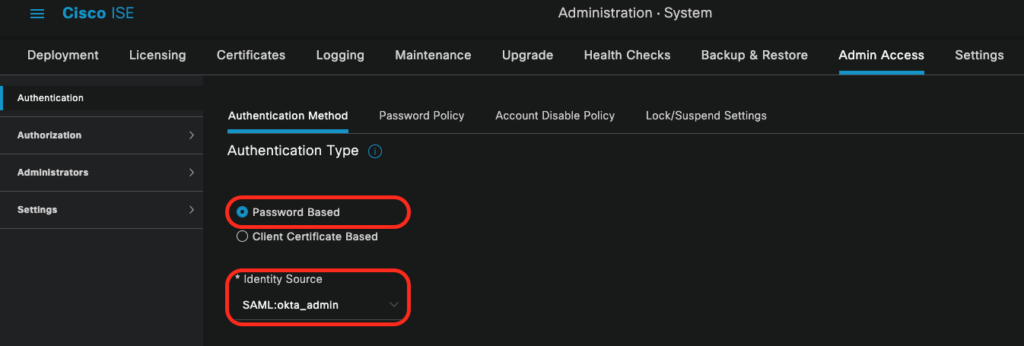
Step 2: Configure Cisco ISE Admin access authentication method
Now we need enable Cisco ISE to use the defined SAML Identity Source. Thus, navigate to Administration ->System -> Admin Access -> Authentication -> Authentication Method. Make sure the Password Based radio button is checked. Select the Okta IdP, which is created in the previous step, by clicking on the Identity Source drop down, and click Save.
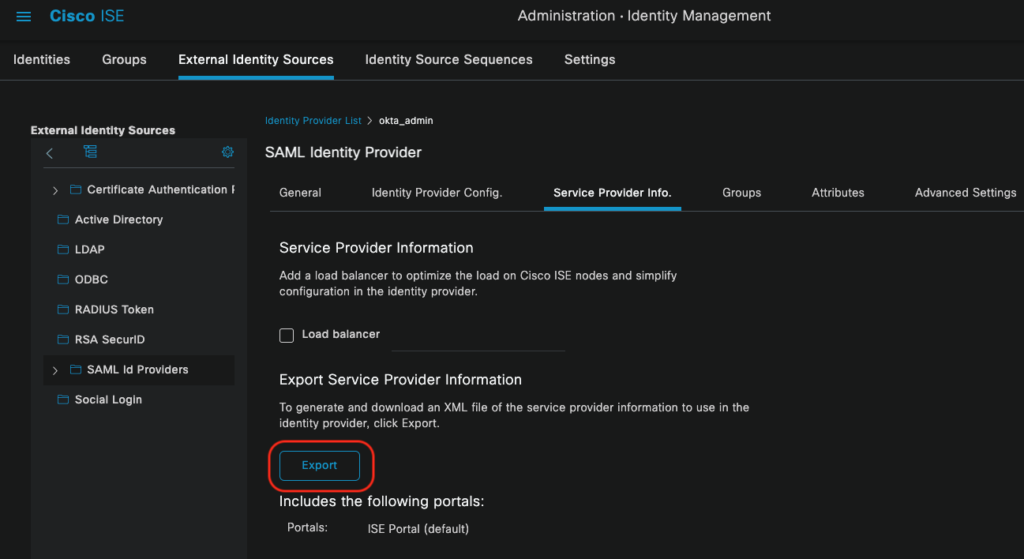
Step 3: Export Service Provider Information
After you select the Okta IdP as an admin access authentication method, Cisco ISE creates Service Provider Information. In order to export the information, navigate to Administration -> Identity Management -> External Identity Sources -> SAML Id Providers -> [Okta SAML Provider]. Click on the Service Provider Info tab, and click the Export button as shown in the image.
An XML file will be downloaded, and you need to open it with a text editor tool. Interested attributes in this XML file are as follows and we need them creating an application within the Okta.
- entityID
- AssertionConsumerSrevice (Normally you should see two of it with different index at the end)
<?xml version="1.0" encoding="UTF-8"?><md:EntityDescriptor xmlns:md="urn:oasis:names:tc:SAML:2.0:metadata" entityID="http://CiscoISE/a486c6ef-6c77-4bc1-bf6d-4e479b3aeae8">
<md:SPSSODescriptor AuthnRequestsSigned="false" WantAssertionsSigned="false" protocolSupportEnumeration="urn:oasis:names:tc:SAML:2.0:protocol">
<md:KeyDescriptor use="signing">
<ds:KeyInfo xmlns:ds="http://www.w3.org/2000/09/xmldsig#">
<ds:X509Data>
<ds:X509Certificate>
MIIFhjCCA26gAwIBAgINAiEFe3uca/qGfi2pqzANBgkqhkiG9w0BAQwFADA3MTUwMwYDVQQDEyxT
QU1MX3BhbjAxLm5vYy10b29saW5nLWRldi1mcmEucGxhdGZvcm0yNi5kZTAeFw0yMzA2MTQxNjE5
NDFaFw0yODA2MTIxNjE5NDFaMDcxNTAzBgNVBAMTLFNBTUxfcGFuMDEubm9jLXRvb2xpbmctZGV2
LWZyYS5wbGF0Zm9ybTI2LmRlMIICIjANBgkqhkiG9w0BAQEFAAOCAg8AMIICCgKCAgEAsqmyAp7Z
YxFCBhiAeoE1OtId5O428G3Mn1by/xAJ2YWPWj5sa0L9bsPFGK2f0DDe4JwjwtmZAz9v35HMLFMb
jiPE7vLaLxyRHSJVGw5g2BjRCJHws3NUWrVzpEcN6Kc3Ni8YABQsI15xMv0D4E9/8ez1FMIdn8v+
iBnY4VAzQGZ0uJT31Ej7XQ78D+DgOy4gk5FHqiTICLX3YF83ayBlFIlPRq+MB2BEnNw18kciKMXO
jdq+FVoUPJIaCSKOhVL6BxJ7D7mkCLoWI9JgBGmrJp9khkxRYXCvakOUzJyk3KeCvgSfWXzo/J4f
x5XAiWVuS9TvQh+WyZ6B2gOZjpBiJM2ic2LpjoCbLuMRru+Y39oETnmJjOh+Fjp3skIt2ySnUVfU
3FdVb+pvAoO4vd34NVWo6gi2gtWH0VSBfsfK3pyVATjMTuGJfsJFvDft32XIOSNMi5acTCaVSW+z
/OtkL3jLPFg/lWerWkF49kb8T6rKobgqXm8TpjHN9CnaSvl67/Ek0ub4t1+KH2G3q5mgj/vpkQQH
8MZsdNQng1MKvJiddkkuoM7aGW1sneD+7dWiDFba8c8+64ACm2rXQPzeiNiv+2TX1a/f/eIaADSY
hIX75+WQPxzF2MpwEbvAAnPbZb2jAi0FLleQkPJKbiuIbT2TYJko892pthzDOA5u9ScCAwEAAaOB
kDCBjTAyBgNVHREEKzApgidwYW4wMS5ub2MtdG9vbGluZy1kZXYtZnJhLnBsYXRmb3JtMjYuZGUw
DAYDVR0TBAUwAwEB/zALBgNVHQ8EBAMCAuwwHQYDVR0OBBYEFA04eAt2BjRq+z2BVrISF9GMZp91
MB0GA1UdJQQWMBQGCCsGAQUFBwMBBggrBgEFBQcDAjANBgkqhkiG9w0BAQwFAAOCAgEAIHKzY1pN
f+n1xSbL1Z/z92EbO4vJnQkyFSiSIz6riF+FmoDPqLdqRMEfxwWd96Nw7WTgYr7Sm/gGbuATZhhO
W7vG34voR3Oqp0d0e5PxzGFvMu00vVVFgMFq4eX2BHR1aY94DSK7r7hSWhc3B+ZKRg5jWwZUfGZc
5ykE8xVlFPJRzW2hvbk7EMBNuha8fCNgJHrF3kdhzCQXe33lN9cXBjYVKMk3d7hy/0hsjWAjd3HI
/Ptut46pWBQ+tOfkJB2G7mMl5h/TFPPghjUMY0AILDsVxrhDhCHt73l4/ovt+m9nSy+suONwhNk9
XpKaM/jxctzCBjVs/Dpm3ZF801Z7fayq1S0HHadveIjcQzvtLnWDHVLimuh2FxZWwm9MOt/jVJ8Z
A7sKbniQJSpcjbtIK+rw50g5MOxVMUAnnQxXJTyVNm+93tNtibLldKGviItcQNYxkNo01jM2vU4k
aivqtZpVsspObg4lL7ktksykwhhR2RgjetuqVRjKO2udPRvMCMKhdE+XiZuRfzpUX+cgJd7SMqOP
TkKP3gLSvsQW7zMgQDC+CtSvNyWXbBjnfe44shU+72ljvGyMkc3K1nlvCz9Fr1uyTnouqkTmec1b
+7dntYUjwsUtMm1NKBUJUrH0UoVv5h9lHIY4j0XglIcTLxonZgJHCNgzSp6AmxwvXec=
</ds:X509Certificate>
</ds:X509Data>
</ds:KeyInfo>
</md:KeyDescriptor
><md:NameIDFormat>urn:oasis:names:tc:SAML:2.0:nameid-format:transient</md:NameIDFormat>
<md:NameIDFormat>urn:oasis:names:tc:SAML:1.1:nameid-format:emailAddress</md:NameIDFormat>
<md:NameIDFormat>urn:oasis:names:tc:SAML:2.0:nameid-format:persistent</md:NameIDFormat>
<md:NameIDFormat>urn:oasis:names:tc:SAML:1.1:nameid-format:unspecified</md:NameIDFormat>
<md:NameIDFormat>urn:oasis:names:tc:SAML:1.1:nameid-format:WindowsDomainQualifiedName</md:NameIDFormat>
<md:NameIDFormat>urn:oasis:names:tc:SAML:2.0:nameid-format:kerberos</md:NameIDFormat>
<md:NameIDFormat>urn:oasis:names:tc:SAML:1.1:nameid-format:X509SubjectName</md:NameIDFormat>
<md:AssertionConsumerService Binding="urn:oasis:names:tc:SAML:2.0:bindings:HTTP-POST" Location="https://172.31.16.111:8443/portal/SSOLoginResponse.action" index="0"/>
<md:AssertionConsumerService Binding="urn:oasis:names:tc:SAML:2.0:bindings:HTTP-POST" Location="https://ise.nssnote.com:8443/portal/SSOLoginResponse.action" index="1"/>
</md:SPSSODescriptor>
</md:EntityDescriptor>
Okta Configuration
Step 4: Creating an Okta SAML Application
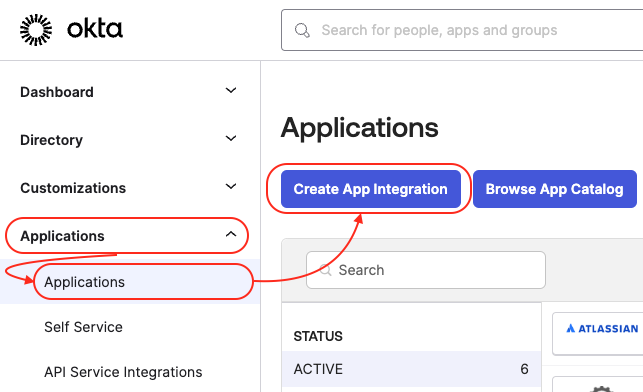
Now we need to define the Cisco ISE Admin Portal as a SAML Application within the Okta. To do so, login to Okta admin portal, and navigate to Applications -> Applications, and click on Create App Integration button. In the Create a new app integration select SAML 2.0 radio button, and click Next.
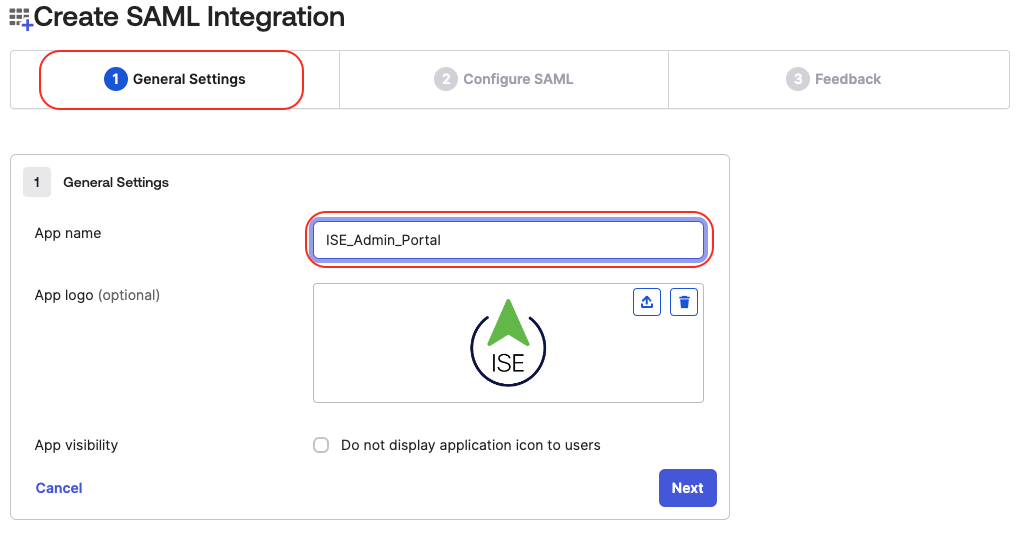
In General Settings, provide a proper name for the Cisco ISE Admin Portal application, in my case ISE_Admin_Portal, and click Next. Optionally, you can upload a logo for your application.
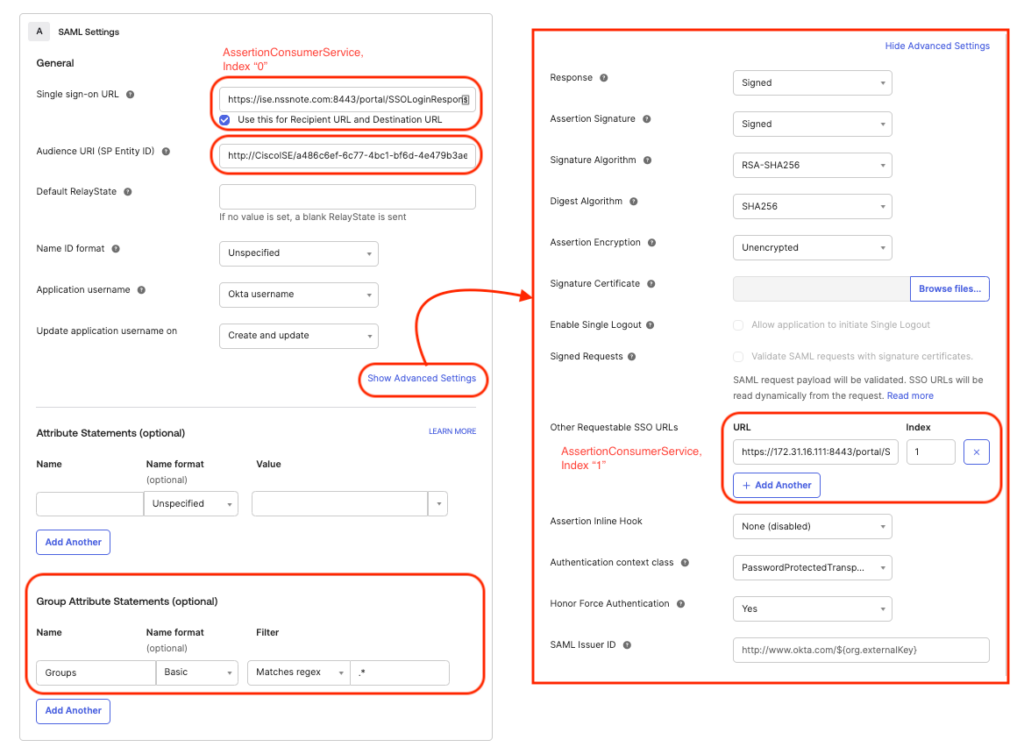
In Configure SAML, in SAML Settings part, the following information must be provided:
- Single sign-on URL -> this is the AssertionConsumerSrevice index 1 in the XML file (step 3)
- Audience URI (SP Entity ID) -> this is the entity ID in the XML file (step 3)
In order to Okta sends group attribute values to Cisco ISE, Group attribute statement must be set according to the following image.
Notes: the Name parameter will be used latter in the Step 7
Then, click on Next and click on finish. Make sure you assign groups to the application.
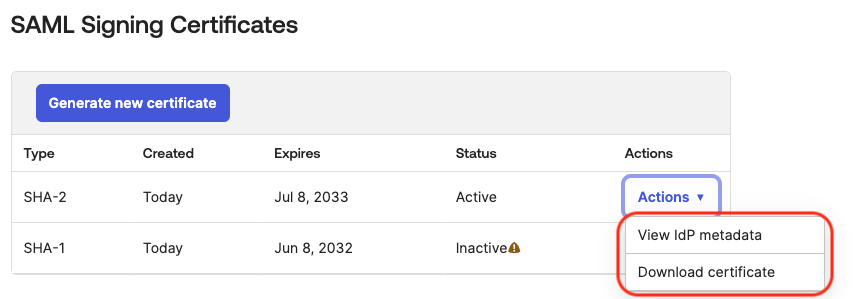
Then move to Sign On tab of the application, scroll down to the bottom. In the SAML Signing Certificate, click on Action button for the active certificate, and do:
- Click on View IdP metadata, and save it as an XML file.
- Download the certificate file
Cisco ISE Configuration Part 2
Step 5: Upload Okta Certificate to Cisco ISE
Navigate to System -> Certificate -> Certificate Management -> Trusted Certificate and import the certificate you have downloaded from Okta.
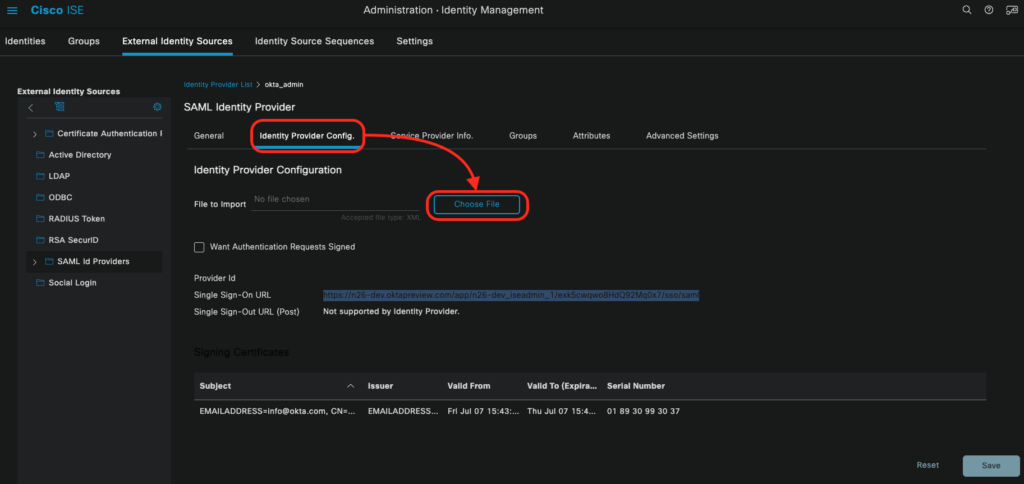
Step 6: Upload MetaData from Okta to Cisco ISE
Now, we are going to tell Cisco ISE how to redirect users to Okta for authentication. For doing this navigate to Administration -> Identity Management -> External Identity Sources -> SAML Id Providers -> [Okta SAML Provider] and switch to Identity Provider Config tab. Click on Brows, and select the Metadata XML file you have downloaded form Okta earlier, and Click Save
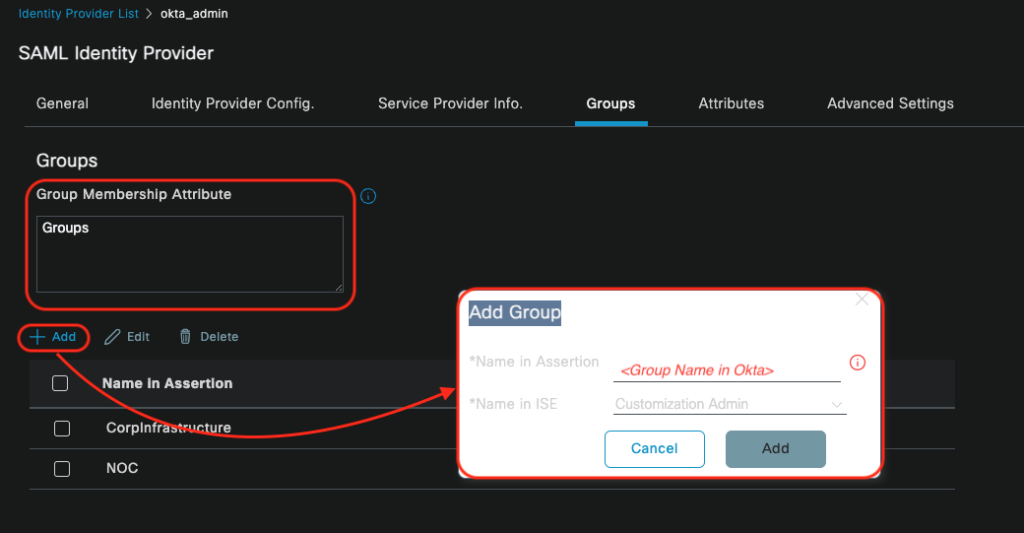
Step 7: Configure SAML Groups on Cisco ISE
Groups configuration is mandatory for Cisco ISE Admin Portal. Thus, switch to Groups tab, and click on Add button. Information should be provided as blow, and keep in mind that for each Okta group that you want to have access to the Cisco ISE Admin Portal, you need to add a new group name in the Cisco ISE.
- Name in Assertion: <Okta Group Name>
- Name in ISE: the admin groups you have in Cisco ISE, and you must choose within the drop down menu
In the Group Memberships Attribute you need to enter Groups ( you have defined it in the step 4 as a group membership attribute)
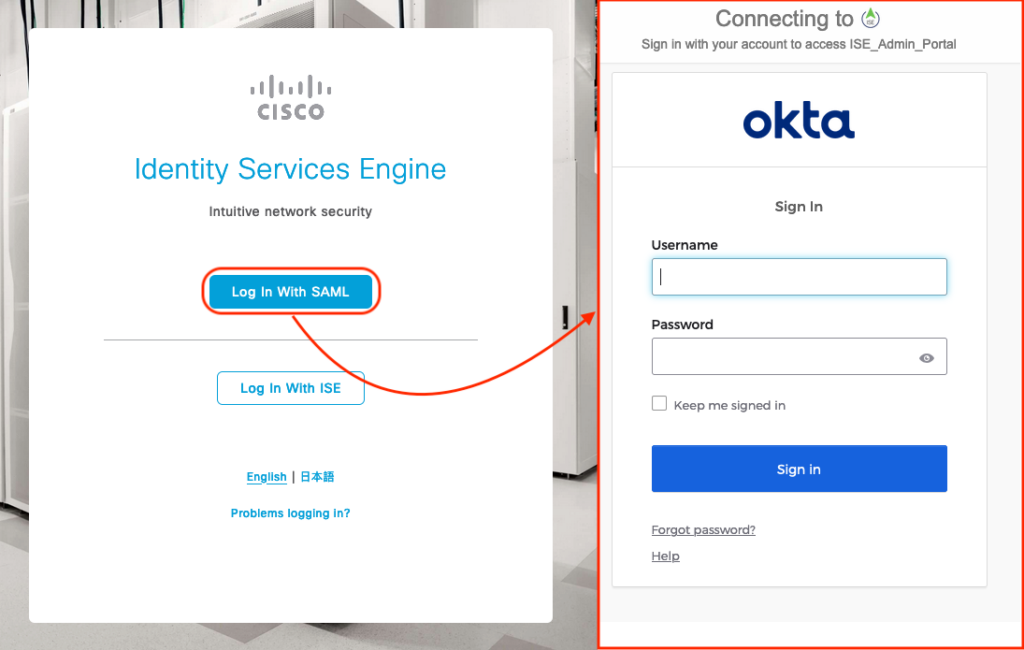
Now you can open Cisco ISE in another browser and you must see the new login option.
If you get an error or see any issues, I would suggest the below link for troubleshooting. It tells you how to enable Debug in Cisco ISE.
I have been surfing on-line more than three hours nowadays, but
I by no means found any attention-grabbing article like
yours. It is lovely value sufficient for me. Personally, if all site owners
and bloggers made good content as you did, the web shall be a lot more helpful than ever before.